There are many ways to transfer screenshots from iPhone and iPad to Mac. You can use built-in app like Messages, third-party app like Instashare and Dropbox, or the classic email client. But what I’m looking for is more than just transferring those screenshots.
I’m looking for a seamless workflow to transfer all the screenshots into a single folder called Screenshots. This folder stores all the screenshots taken on iPhone, iPad, and Mac. On top of that, all the imported screenshots must be converted from PNG to JPG automatically.
Define your requirements
One of the method to create efficient Hazel rules is to define the requirements beforehand. Based on my needs above, these will be the requirements:
- All screenshots taken on iPhone and iPad are saved in a folder called Screenshots on Mac.1
- These screenshots must be converted from
PNGtoJPGformat.
I can define more requirements, but these two are enough for me. Maybe you want store screenshots in different folders, maybe you want to tag them with colors, or maybe you want to crop them. Before we create the rules, we need to define the requirements.
Building the workflow
First, I need a seamless way to transfer screenshots from iPhone and iPad to Mac. This one can be easily solved by using Dropbox’s Camera Upload.
I choose Dropbox because of its simplicity — you don’t have to choose which screenshots you want to transfer, you don’t need to confirm which screenshots you want to accept. You just run Dropbox for iOS.2 Of course, the drawback is you need an active Internet connection.
Now the second part: differentiating screenshots from the rest of photos. If you don’t differentiate them, Hazel will move all the photos in Camera Upload folder to your screenshots destination folder.
Because screenshots have fixed size, you can configure rules that detect the photos dimension3, and process them accordingly. The screenshots taken on iPad mini is always 1024 × 768, therefore I create a rule called “Move iPad Screenshots” that detects 768 × 1024 dimension for portrait or 1024 × 768 dimension for landscape screenshots, and move them to my Screenshots folder.
In the screenshot above I use any as the matching rules. One of the less known tips when defining conditions is that you can create nested rules by pressing the + button while holding Option. This allows you to come up with several matching conditions in one rule instead of creating many Hazel rules.
I’ve also renamed all the imported screenshots to follow the same naming pattern as the screenshots taken on Mac.
Converting PNG to JPG Automatically
All of my screenshots are in JPG format because they’re smaller than PNG in term of file size. You can even compress the size further — usually up to 50% — with ImageOptim. I’m not saying JPG is better than PNG, but for screenshots that don’t need transparency, JPG is more suitable.
There are several ways to complete this task too. You can use Hazel to detect all PNG images inside Screenshots folder, run an imagemagick to convert, crop or compress all of them at once.
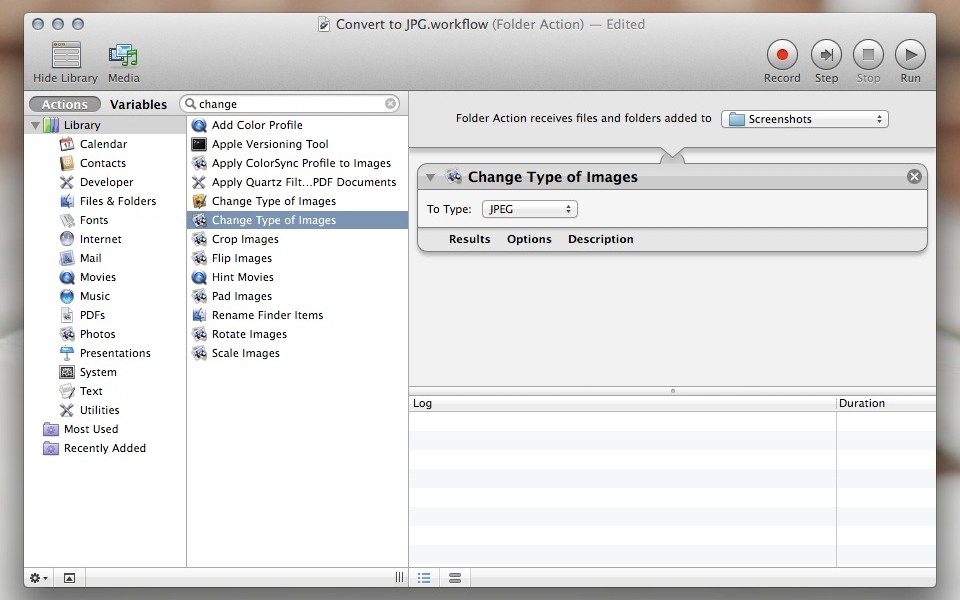
Or you can create a folder action in Automator to avoid scripting. The end result will be something similar to the screenshot below.
Run Automator and create a new Folder Action. If this is the first time you use Automator, don’t worry, it’s not as complicated as you think. Folder Action basically means we attach a workflow to the folder that will run whenever there is a new files found in the associated folder.
The left sidebar contains the list of available actions, while the right side is your workflow panel.
Select a folder to receive action, and drag Change Type of Images action into the right side of working dashboard. Select JPEG as your preferred format. Press Command+S to save.
Test the folder action by moving one of the PNG images into the associated folder. The PNG images should convert to JPG automatically. You can even use this folder to batch convert photos.
Now take some screenshots on your iPhone or iPad, run the Dropbox for iOS, watch how Hazel and Automator move your screenshots and convert them automatically.
Wrapping Up
The wonder of this workflow is everything has been taken care by the system. You just take some screenshots and run Dropbox.
Are you wondering how to be notified when the screenshots are transferred completely? Consider create a beautiful stack icons that’ll show you the latest screenshots directly from Dock. It won’t disappoint you.


