Evernote remembers everything. Workflow automates most of the things. When you combine these two apps together, you have a wonderful setup that can create a note with a few taps. The Workflow series is incomplete if I don’t share these workflows I built as an avid Evernote user.
In this post, you’ll learn a few tips I’ve shared in the Workflow beginners. These workflows mostly deal with text, but mastering the basic concept should give you enough understanding to build complex macros that pull dictionary data from URL, or download media from URL.
Evernote Web Clipper
Evernote Web Clipper for Safari on OS X is tremendously powerful. You can save a single web page, or annotate and save as screenshot. On the other hand, Evernote extension in iOS falls behind when it comes to supporting these handy features. You can only save the web page as a whole.
Whenever I’m reading an article that contains a lot of inspiring quotes in Instapaper, I always highlight and have them sent to Evernote. But sometimes I read the article now in Safari where Evernote extension doesn’t support sending selected text as a new note.
This workflow mimics two features that are available in the Evernote extension for OS X. The first one is the ability to send only selected text as a new note. The second one is sending selected image as a new note.
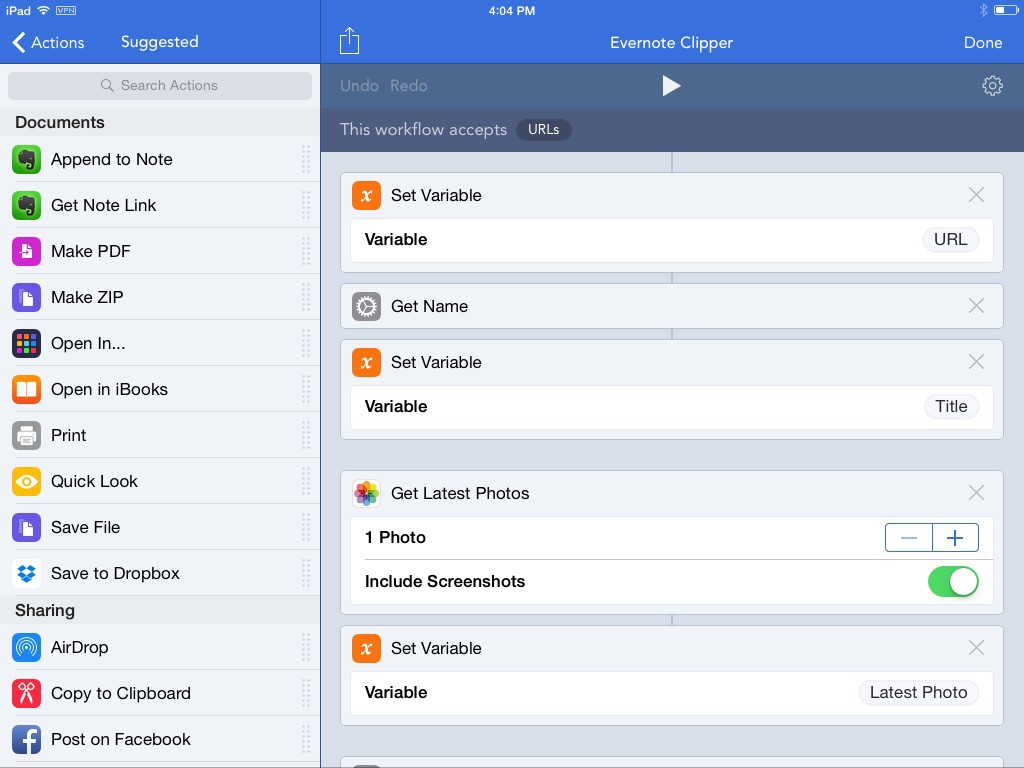
Here is the breakdown of how the workflow works.
- Workflow fetches the URL as input and store it into
URLvariable. - Get Name action reads and stores the site title as
Titlevariable. - Get Latest Photo action stores the photo into
Latest Photovariable. - List action lets you create a list of notebooks you can choose when running this workflow and store it into
Notebookvariable. You can always add more notebooks to the list later.
This is the first tips I shared: prepare the variables you want to use beforehand.
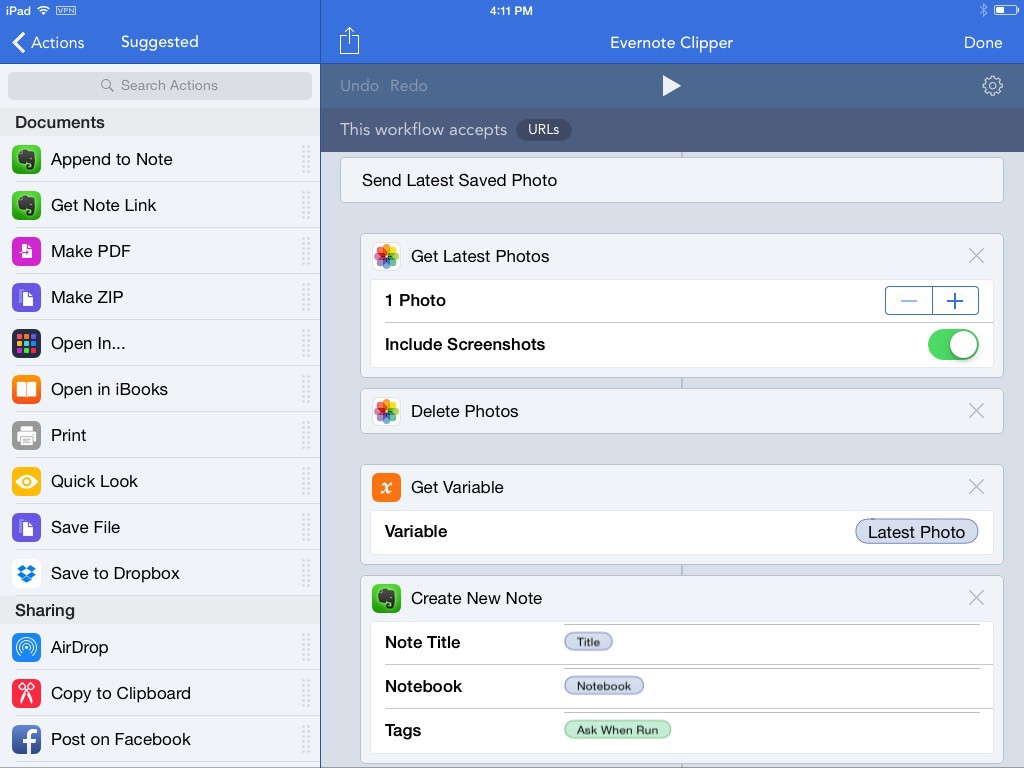
There are two features I want to create, so I add a Choose from Menu action combining these two features using similar variables into one workflow.
Send Clipboard creates a text from clipboard, and then get sent to Evernote where I use the site title as notebook title.
The second option is Send Saved Latest Photo. The reason I avoid Get Images from Input is because that action will download all the found images on a web page, which can drain the battery and your data package like a hungry ghoul. Efficiency is the key. The workflow will first delete the latest saved photo — since you’ve saved the photo into variable, deleting latest photo won’t remove the one you store in a variable until the workflow finish running. It’ll then send the Latest Photo into a new note along with the site title.
If I want to do the second action step by step. I’ll need to save the photo, switch to Photos.app, and use the share sheet to send the photo to Evernote. I must also copy and enter the site title from the URL manually. Instead of going through these painful steps. I can tap and hold the photo, save it to camera roll, and complete the rest of steps in one action.
We’ve laid the foundation for the workflow that we can build upon later if we ever need to change it for a different kind of purposes. If you ever find yourself in need to create more options sending to other services, you can just add a new item in Choose from Menu action and reuse all those stored variables.
Here is a challenge. Try adding a feature to save a web page as PDF in this workflow. Hint: Workflows has a built-in Make PDF action you can use to simplify the process.
Download Evernote Web Clipper Workflow
Sending iBooks Highlights to Evernote
I made this workflow when I was reviewing the highlights I’ve saved from Instapaper and iBooks in Evernote. Before using Workflow, I used to save iBooks highlights by using the share sheet, which you can access by tapping the highlights, and send an email to my personal Evernote email address.
The result, especially the one you buy from iBooks, is ugly. You’ll get this horrible layout with book cover along with book rating at the end of the note. There are no line breaks that separates the date and chapter title. It’s a chunk of text mashed together.
Since I want to maintain the workflow as simple as possible, I avoid cleaning the note and renaming the note title despite that I’m not satisfied with how it turns out.
Then Workflow is available on App Store. I immediately use it to build the workflow to send highlights from iBooks to Evernote.
This workflow separates the quote, author, and title into different variables that I use to create a new note in Evernote. It uses Match Text action and a regular expression to capture part of the clipboard, and Replace Text action to remove useless words. While this workflow only accepts Text as input, you can also customize it to accept Rich Text or Clipboard.
The ideal way to use this workflow is running it directly from iBooks so you can continue sending highlight without switching apps. But somehow the workflow won’t appear in the share sheet despite that I’ve chosen the workflow to accept Anything as input. I assume iBooks highlight uses a different data type that Workflow hasn’t yet added the support.
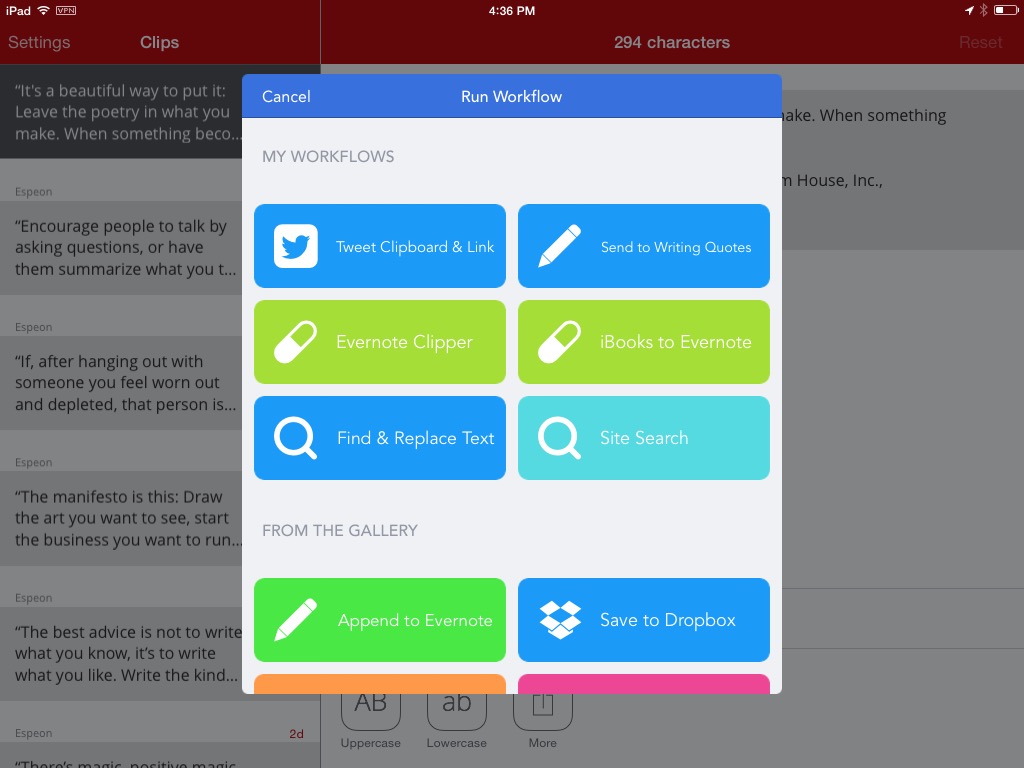
That’s the only drawback, but there is a workaround by using Clips to store clipboard history with iOS 8 widget. Here is how you can use this workflow to save a lot of highlights in one reading session.
- Highlight an item in iBooks.
- Copy selected highlight with share sheet.
- Activate Today View in Notification Center and send the clipboard to Clips.
- Repeat step one to three until you’re done with your reading session.
- Open Clips and run this workflow for each saved highlights.
You can run this workflow in any share sheet that accept text, such as Drafts which has a widget to append clipboard as a new note.
Download iBooks to Evernote Workflow
If you’re new to regular expression, you can read the brief regular expression guide that covers the basics. Mastering regular expression will open up the type of workflows you can build in future.


